
What is UV unwrapping and do I need it?
The short answer
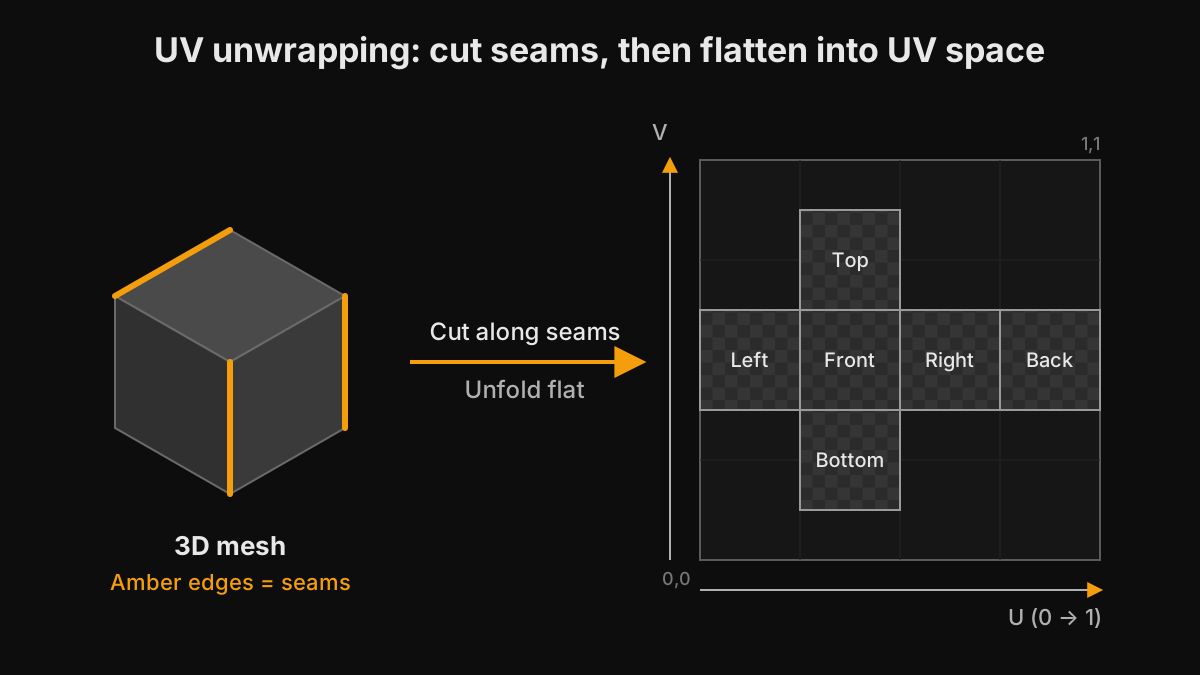
UV unwrapping is the step that tells a texture where to go on a 3D model. A mesh is a closed shell of polygons, but a texture is a flat rectangle of pixels. To connect the two, you cut the shell along a few edges (seams) and unfold it flat, the same way you would unfold a cardboard box. The flattened pieces are placed inside a square called UV space, and every vertex remembers where it landed. You need UVs for any texture that is unique to a model: hand-painted textures, baked normal and ambient occlusion maps, and AI-generated textures such as the ones TextureFast creates.
What U and V actually mean
3D positions already use the letters X, Y, and Z, so texture coordinates use U for the horizontal axis and V for the vertical axis to avoid confusion. In the standard tile, both run from 0 to 1: one corner of the image is (0, 0) and the opposite corner is (1, 1). When the renderer draws a triangle, it blends the UV coordinates of the triangle's three corners and reads the texture pixel at each point in between. That is why a single image can wrap around a complex shape without any extra geometry.
A model can store more than one UV set, also called a UV channel. Game engines commonly use the first channel for color and material textures and a second channel for lightmaps. Different programs also disagree on which way V points: Blender puts V = 0 at the bottom of the image, while glTF and DirectX-style tools count from the top. Exporters normally handle the flip for you, so if a texture ever appears upside down after moving a file between apps, a V flip is the usual cause.
Seams, islands, stretching, and overlaps
Seams
A seam is an edge where the mesh is cut. Pixels on either side of a seam come from different parts of the image, so any mismatch in color or pattern shows up as a visible line. Good seam placement hides cuts along hard edges, on the underside of objects, behind ears and inside arms on characters, and along natural material boundaries such as where fabric meets metal.
Islands and padding
Each connected flattened piece is called an island or shell. Islands need a small gap between them, usually around 8 to 16 pixels at 2K resolution. Engines use mipmaps, smaller copies of a texture for distant objects, and at those smaller sizes neighboring pixels blur together. Without padding, color from one island bleeds into another and you see thin colored lines along seams at a distance.
Stretching
A curved surface cannot be flattened without some distortion, which is the same reason world maps exaggerate the size of Greenland. The goal is to keep distortion low where people will look. Stretched UVs smear a texture in one direction; compressed UVs cram detail into too few pixels. Adding a seam in the right place usually fixes stretching better than any unwrap setting.
Overlaps
When two islands occupy the same UV space, they show exactly the same pixels. Artists sometimes do this on purpose, for example stacking the two mirrored halves of a symmetrical prop to save texture space. Overlaps are a problem for baking, because both surfaces bake onto the same pixels, for lightmaps, which need every face to have its own space, and for any texture that should differ from one part of the model to another.
Texel density
Texel density is how many texture pixels cover a given area of the model, often measured in pixels per meter. If a chair's seat island is large and its legs are tiny, the seat looks sharp while the legs look blurry. Scaling islands so their texel density roughly matches keeps wood grain, scratches, and fabric weave at the same visual scale across the whole object.
Do you need UV unwrapping?
It depends on how the surface gets its detail. Here is a practical rule set:
- Yes, for unique textures. Anything painted in Substance 3D Painter, Blender Texture Paint, 3DCoat, or Photoshop needs UVs that do not overlap where the detail should be different.
- Yes, for baking. Normal, ambient occlusion, and curvature maps baked from a high-poly model are written into UV space.
- Yes, for AI texturing in TextureFast. The generator paints directly into your UV layout, so the layout is the map it follows.
- Usually yes, for game engines. Unity, Unreal Engine, and Godot sample textures through UVs, and lightmapped static meshes also need a second, non-overlapping channel. Unity and Unreal can generate lightmap UVs on import.
- Not always, for procedural or triplanar materials. A Blender shader driven by Generated or Object coordinates, or a triplanar material in an engine, projects the pattern from object or world space. Rocks, terrain, and architectural blockouts often work this way.
- Not again, for most downloaded assets. Game-ready marketplace models and photogrammetry scans usually ship with UVs. Inspect them before you redo the work.
How to unwrap a model in Blender
- Select the mesh, press Tab to enter Edit Mode, and switch to edge selection.
- Select the edges where you want cuts and choose Edge > Mark Seam. Hard edges, hidden sides, and material boundaries are good candidates.
- Press A to select everything, press U, and choose Unwrap. For quick tests, Smart UV Project cuts seams automatically based on face angles.
- Open the UV Editing workspace and create a test image with Image > New, setting Generated Type to UV Grid or Color Grid. Assign it to the material and look for stretched or unevenly sized squares.
- Scale islands so their texel density matches, then run UV > Pack Islands with a margin so packing preserves that margin and islands do not touch.
- Export as GLB, GLTF, FBX, or OBJ with UVs included. GLB is the most reliable choice for TextureFast.
Maya, 3ds Max, Houdini, and 3DCoat have equivalent tools, and RizomUV is a dedicated unwrapping app that many studios use for fast, low-distortion layouts. The concepts of seams, islands, packing, and texel density are the same everywhere.
Check your UVs with a checker map
A UV checker map, sometimes called a UV test texture, is a grid of numbered or colored squares. Applied to a model, every square should look square and roughly the same size. Rectangles reveal stretching, tiny squares reveal higher texel density, and sudden jumps in the pattern reveal seams. It is the fastest way to judge an unwrap without rendering anything.
The free UV map inspector on TextureFast does this in the browser. Upload a UV-mapped model to see the 3D view and the 2D layout side by side, switch between checker presets, and highlight overlaps, seams, out-of-bounds shells, and texel density problems. It also shows UDIM tile ranges when UVs extend past the first tile. If you want to paint over the layout in Photoshop or Krita, the UV maps extruder exports each UV channel as a PNG.
How UVs affect AI texture generation
TextureFast reads your model locally in the browser, renders the UV layout as a flat image, and sends that image with your prompt. The mesh geometry itself is not uploaded. The image model then paints the Base Color into that layout, which means UV quality sets the ceiling for output quality. Large islands on visible parts get more detail. Tiny, scattered islands get less. A seam cutting across a visible face can break the pattern, and overlapping islands receive identical pixels. PBR maps extracted afterwards use the same layout, so the same strengths and problems carry through.
If a result shows seam lines or mismatched scale between parts, fix the UVs and regenerate. Rewriting the prompt will not solve a layout problem, and a clean unwrap usually improves every later generation on that model.
Ready to try it?
Open the matching TextureFast workflow
Continue from this answer into the public workflow page, then start generation or compare plans when you are ready.