
How do I get normal maps or roughness maps?
The short answer
There are four common ways to get a normal map and a roughness map. You can bake them from a detailed high-poly model, derive them from a photo or color texture, download them as part of a ready-made material, or generate them with AI. Baking gives the most accurate normal maps for a specific model. Photo-derived and AI-derived maps are much faster and work well for surface detail such as wood grain, fabric, scratches, and stone. In TextureFast, you generate a Base Color for your model, open the PBR Material tab, and extract Normal, Roughness, and the other maps from it.
What a normal map does
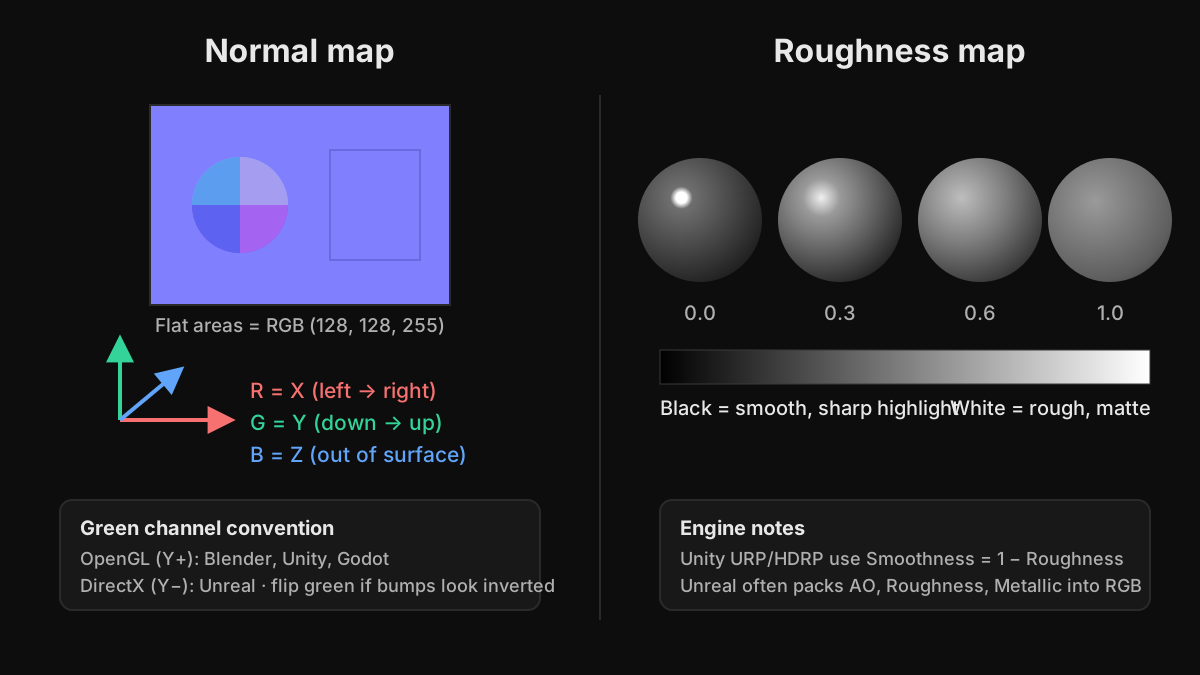
A surface normal is the direction a surface faces. A normal map stores a direction for every pixel, using red for X, green for Y, and blue for Z. The lighting engine uses those directions instead of the flat polygon, so small bumps, grooves, and rivets catch light as if they were modeled. A flat area stores (128, 128, 255), which is why tangent-space normal maps look light blue-purple. Normal maps change only the lighting, not the shape: the silhouette stays flat. For real depth, you need a height or displacement map.
OpenGL vs DirectX normal maps
There are two conventions that differ only in the green channel. Blender, Unity, Godot, and glTF expect OpenGL-style maps, where green points up (Y+). Unreal Engine expects DirectX-style maps, where green points down (Y-). If you use the wrong one, bumps look like dents and the lighting seems to come from the wrong side. The fix is to invert the green channel, either in an image editor or with the Flip Green Channel option in Unreal's texture settings.
What a roughness map does
A roughness map is a grayscale image that controls how sharp or blurry reflections are. Black (0) is perfectly smooth, like a mirror or wet paint, with a small, bright highlight. White (1) is fully rough, like chalk or raw concrete, with a broad, dull highlight. Most of the realism in a PBR material comes from roughness variation: polished edges on worn metal, fingerprints on glass, dusty tops on furniture, and damp patches on stone.
Some tools use glossiness or smoothness instead, which is simply roughness inverted. Unity URP's Lit shader reads Smoothness from the alpha channel of the metallic map or base map, so you invert a roughness map before packing it. Unreal projects often pack ambient occlusion, roughness, and metallic into the red, green, and blue channels of one ORM texture. glTF stores roughness in the green channel and metallic in the blue channel of its metallicRoughness texture.
Four ways to get normal and roughness maps
1. Bake from a high-poly model
Sculpt the detail on a high-resolution model in ZBrush or Blender, build a low-poly version for the game, and bake the difference into a normal map with Blender Cycles, Marmoset Toolbag, or Substance 3D Painter. This is the most accurate method because the normals come from real geometry. It needs a clean, non-overlapping UV layout and some care with bake distance or cages. Roughness is not baked from geometry; it is painted or generated on top, often using the baked curvature and ambient occlusion maps as masks.
2. Derive them from a photo or base color
Tools such as Materialize, Substance 3D Sampler, and GIMP's Normal Map filter estimate height and normals from the brightness and shading in an image, and let you build a roughness map from its tones. It is fast, but brightness is not the same as height: a dark stain can turn into a dent. It works best on fairly flat, evenly lit surfaces such as bricks, planks, fabric, and stone.
3. Download a complete material
Libraries such as Poly Haven and ambientCG offer free CC0 materials, and Megascans on Fab offers scanned surfaces. Each comes with normal, roughness, and usually displacement and ambient occlusion maps. These are tiling materials, excellent for floors, walls, and terrain, but they are not laid out for your specific model's UVs.
4. Generate them with AI
In TextureFast, the maps come from the Base Color generated for your own UV layout, so every map lines up with the model. Like method 2, the extraction estimates relief from the image rather than from geometry. That makes it very fast and a good fit for surface detail, while large forms are still best modeled or baked.
- Upload a UV-unwrapped GLB, GLTF, OBJ, or FBX model and generate a Base Color from a prompt.
- Open the PBR Material tab and choose 1K or 2K for the extracted maps.
- Click Normal and Roughness individually, or add Height, Ambient Occlusion, and Albedo. On Pro and higher plans, one-click full material generation creates all available maps at once.
- Preview the maps on the model, then download the PNGs individually or as a zip.
Setting up normal and roughness maps in your engine
- Blender: set both image nodes to Non-Color. Connect the roughness image to the Roughness input of the Principled BSDF, and route the normal image through a Normal Map node into the Normal input.
- Unity URP: in the import settings, set the normal texture's Texture Type to Normal map. Invert roughness to get smoothness and store it in the alpha channel of the metallic map.
- Unreal Engine: if a normal map is not detected on import, set Compression Settings to Normalmap, and enable Flip Green Channel for OpenGL-style maps. Turn off sRGB on the roughness texture.
- Godot: enable Normal Map on the StandardMaterial3D and assign the texture, then assign the roughness texture in the Roughness section. Godot expects OpenGL-style normals.
- glTF and GLB: Blender's glTF exporter packs roughness and metallic into one texture automatically when you export.
If a surface looks milky, washed out, or unexpectedly shiny, the roughness or normal map is almost always being read as sRGB. Data maps must be linear or non-color. If bumps look inverted when you rotate a light around the model, check the green channel convention.
Ready to try it?
Open the matching TextureFast workflow
Continue from this answer into the public workflow page, then start generation or compare plans when you are ready.